


Hi All! Julie here, ready to dish out exactly how we (Emily Bowser & myself) managed to create/mostly troubleshoot all these cute DIYs for the mountain house kids room we revealed earlier today. First off, I will let you in on a little secret: these projects were my first DIY attempts…ever. I have some sewing experience from when I was in high school about *cough* 15 *cough* years ago but aside from that, I have never tried my hand at upholstering or making window treatments, let alone creating a whimsical tent for two little kids. So when Emily, Emily B. (going to refer to her as Bowser to make things less confusing) and myself were brainstorming the room and decided on the adventure theme, we went on Pinterest for inspiration and came across this similar window treatment idea which we eventually made our own for the space. Emily asked Bowser and myself if we thought that we could make something similar for the room, we paused, looked at each other, and said “we can figure something out.” Basically we rock, paper, scissored to see who would execute the window treatments and since I owned the better sewing machine of the two of us (hers was from IKEA, love you Bowser but we didn’t think that would get the job done) it was up to me and my 15-year-old sewing machine to make window treatments up to par for an Emily Henderson Designed room for Target, no pressure. Immediate internal panic sets in.
All in all, if you do have some sewing experience, a decent sewing machine, the proper needle and lots of patience, I think this window treatment is very doable. Especially since I threw away the first round and figured out a simpler way to construct them. I was pretty happy with how they turned out so much sew (pun intended) I am actually making the same window treatments for my space with a different fabric. Should I just open up my own Etsy shop at this point? I hope you all love them as much as we do!
The Window Treatments

What you’ll need to make them yourself:
- Fabric of your choice (we used: 11oz Broken White Bull Denim “aka white canvas”)
- 7/8″ Leather Strips in tan color (currently out of stock, medium brown is closest in color to what we used)
- 3/8″ Grommet Kit (if you already own a kit, get some refills here)
- 1-1/4″ Cup Hooks
- Blackout liner in white (especially if you are using a white fabric)
- Sewing Machine
- Denim or Leather Sewing Needle
- White Sewing Thread
- Cutting Mat
- T-Square 24″
- Fabric Rotary Cutter
- Fabric Straight Pins

Step 1: First things first, exactly how big should you make these window treatments? We created one panel for each set of windows (61″ wide x 44″ long). We wanted the sides of the panel to overlap the outer edge of the window frame by about 2 inches on either side. We then determined that they should sit 6 inches above the header of the window (because that looked best to us so we went with it) and wanted it to overlap the sill of the window frame by 3-4″. Accounting for hemming the fabric (1″ hem for the sides in step 2) and 2-3″ on the bottom edge (in step…well I honestly forgot to take a photo of that step so I will explain that in detail later, sorry!) we cut a piece of canvas 63″ wide by 94″ long. Yes, that is correct 94″ in length (stay with me, I will explain more in steps 3 & 4).
Step 2: Using your Fabric Straight Pins, fold the long edge (94″ long to be exact for me) to create a 1″ wide hem. Once you have pinned the fabric, sew and repeat on the other side.

Step 3: You now should have two hemmed edges…you do? Perfect! Now go ahead and fold your fabric in half longways. When folded, mine measured 61″ wide by 47″ long, give or take a 1/4″ here and there for error. This about the time I regretted not taking Emily up on outsourcing this to a trained professional (note if Emily is reading this: just kidding, I was totally confident it would turn out amazing, of course). You want to make sure that when you fold your fabric, the edges align and lay as flat as possible. Starting on one side, line up your hemmed edges, then holding that in place with a lot of heavy books (told ya I was a professional), smooth out the fabric with your hands so that the other side lines up as close to perfect as possible, pin both sides.
Step 4: Pin a 1/2″ hem along the folded edge. I found out that our spare 1/4″ wooden dowel worked well as a guideline to pin the fabric in place. In the first round that I made (and eventually tossed in the trash), I had used my measuring tape and checked it every couple of inches when pinning the edge (raise your hand if you are a perfectionist).

Step 5: Once you have that folded edge go ahead and sew! Only 4 more hems to sew, told you this was easy, am I convincing you yet?
Step 6: Unfold the fabric along the hem you just did and lay it flat with the inside bottom layer of canvas facing up (as shown in the photo), then place your Blackout liner (I cut mine to be 60″ wide by 38″ long) approx. 4″ from the top of the folded edge hem. Make sure to overlap the blackout liner and the hemmed edges from step 2, you will be using them as guidelines to sew the liner to the fabric. Take your top layer of fabric that is currently folded back and lay it on top of the blackout liner so all three layers are as flat as possible (canvas, liner and canvas). Feel free to use that really professional & great technique in Step 3, I would recommend your grandfather’s dusty encyclopedias that no one including himself read. Once you have it flat, pin both sides first and then sew both sides using the first hem you did as a guideline to sew the liner to the two layers of canvas.
Ladies and gentlemen, we have now come to the part where I forgot to take a photo of the last step of the sewing process probably because I was so excited that I was almost done. Let’s not think about that whole other one I had to make…hahaha good times.
At this point you have done all of the hard steps, all you have to do is take the bottom part of the window treatment, fold a 1″ hem with all 3 layers of fabric. Pin and sew…and then repeat that with a 1.5″ hem. This might be why I would highly recommend getting yourself either the denim or leather sewing needles for this project. I sewed through 6 layers of fabric…yikes. I was just praying that my sewing machine wouldn’t break down on me since we were snowed in up there. If anyone has any recommendations on how to finish this off better, I am OPEN to suggestions…please, anyone. Help a lady out and thank you in advance!
Okay, last part of the construction. I promise. If you are a grommet expert then keep reading but if you are like myself who had never tried to use grommets before, check out this great step by step (thanks, Lowe’s). Pro tip: buy a grommet kit and not just the refills, no Emily we, of course, didn’t do that!
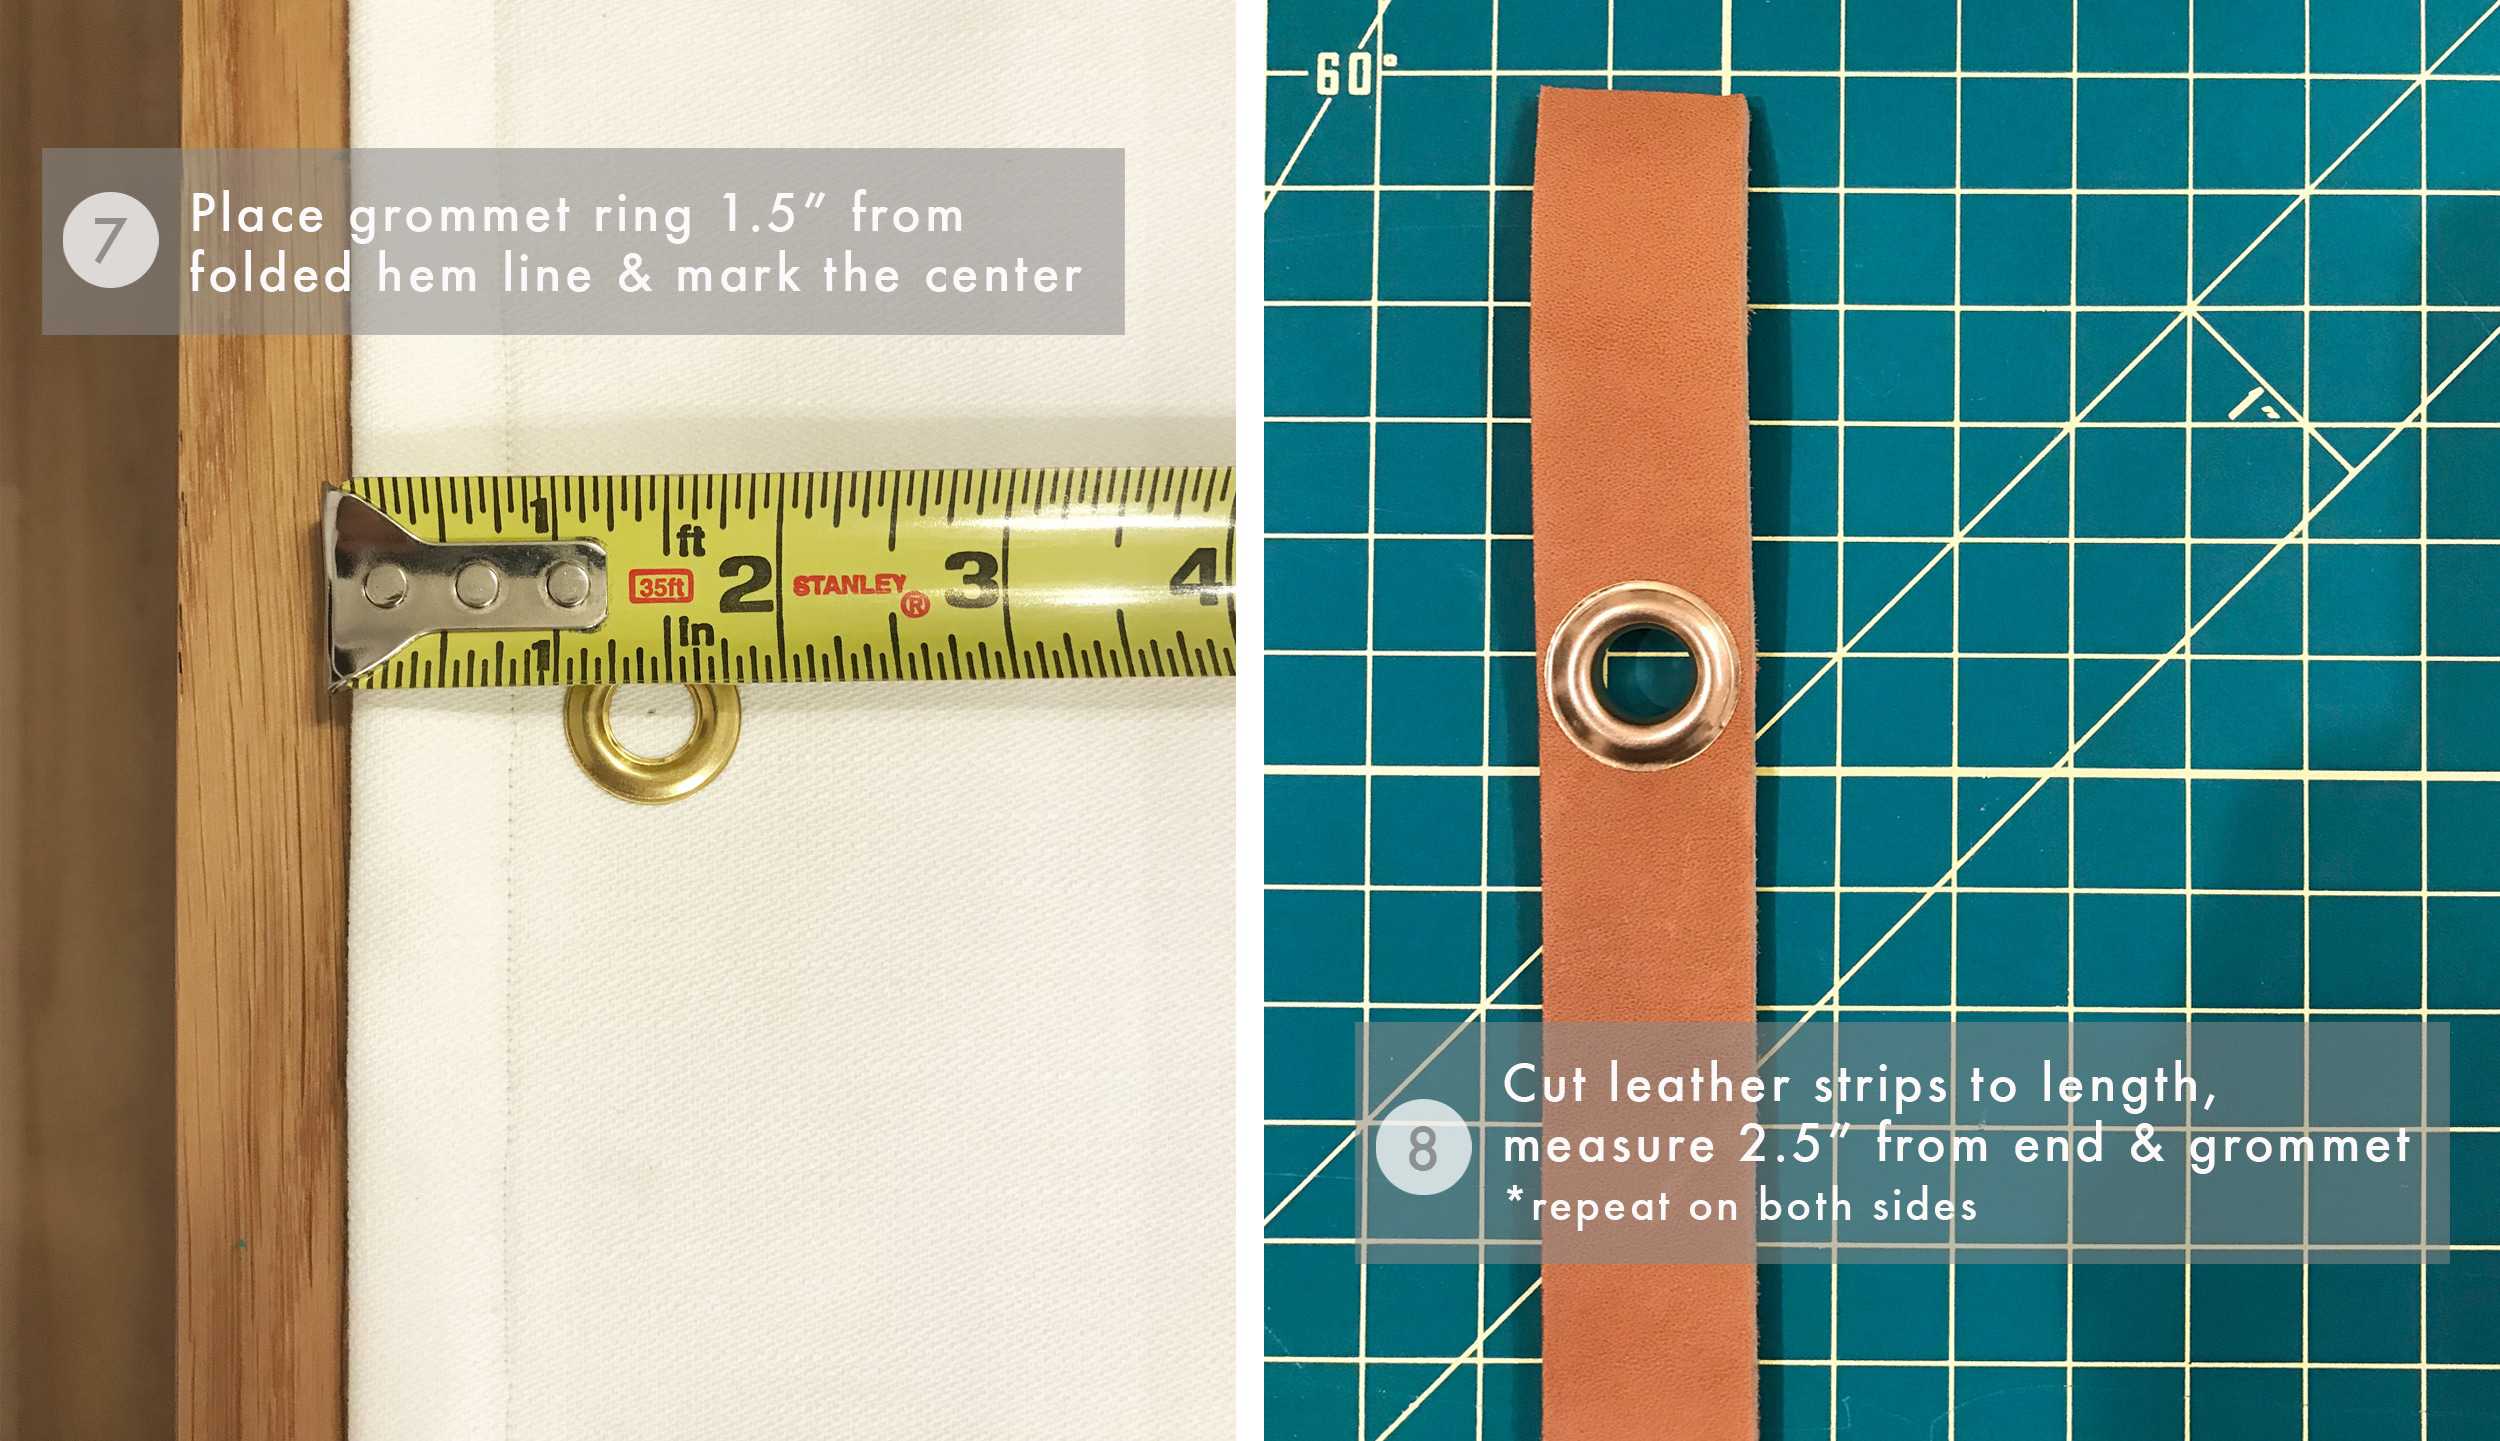
Step 7: Bowser and I had about a 45 min discussion troubleshooting how we would install these curtains and this is what we came up with. Again, we are far from professionals so we are open to suggestions! We determined that we would use 5 grommets per panel. The first would be 6″ in from the edge (same on the opposite side), then we measure and found where the middle one would sit. Then found the middle between the one 6 inches from the edge and middle of the full panel. Wow, I think that was the most confusing sentence I have ever written…hopefully you understand. 🙂 Once we had those measurements, we marked it very lightly along the folded edge hem (step 5) about 1.5″ from the top (photo inaccurate, I blame the photographer—myself). I placed a 3/8″ grommet ring approximately where I wanted it to be, put a dot in the center, grommeted and repeated four more times.
Step 8: My favorite step, the last step! We cut three leather straps 25″ long per panel, total of 10 straps for the project. How did we come to that length for the leather you ask? Well, once the first canvas panel was complete, we ran upstairs to first check if it looked good and second to see how much of it would sit in front of the window itself. Bowser held the fabric 6″ above the top of the window as planned as I rolled up the panel. Then, we picked a place where we liked how high up it was rolled. High enough to show most of the window but not too high that you could see the top of the window frame when standing on the opposite side of the room, again very technical process. Really hope you are all getting my extremely dry humor, if not then this is awkward. Moving along! We measured from the top of the panel to the bottom of the roll; it was somewhere between 9-11″ so we made it an even 10. Since we are wrapping the leather from the back side to the front, we doubled that length and then gave ourselves a couple more inches just in case. Another pro tip: when you are doing a DIY for the first time, you should always over order the materials, we had just about the right amount of leather for the project so we weren’t taking any chances. Measuring 2.5″ in from the edge of the leather, place your grommet, mark the center and then add the grommet. Repeat on the other side. Then repeat on the next 9 straps and you are done!
Now it is time to install them! We used a 2×2 piece of lumber that we cut 4″ shorter than the width of the curtain panel. Using a stud finder, we determined the three points where the piece of wood got drilled into the wall. You can see below that Sara’s brother Shade is drilling it into place, no I did not make him pose for that photo. Also, I apologize for the poor photo quality.

Once Shade got that piece in place, it was an easy installation. Bowser and Grace held up the window treatment, I marked the center of the grommets, then, without the panel held up, pre-drilled the marks and had them hold up the fabric again as I twisted in the center cup hook and then did the rest of the cup hooks on my own. Repeat the process on the other set of windows. All that was left was hooking the three leather straps backside facing you, then hooking the curtain panel, rolling it up and hooking the other side of the leather strap. Done!
Now for what you have all been waiting for, the details on that whimsical DIY Canvas Tent! I also applaud you if you got through reading the window treatment DIY, thanks for sticking with me. 🙂 The explanation for this DIY will be a bit shorter, it was actually easier than we all thought which was a nice surprise after spending hours on the window treatments.
The Canvas Tent

Before you even get your supplies, measure your space. Our ceiling height was 8 feet and the span between those awkward yet necessary posts was 13’4″. We wanted the tent to be impactful yet feel cozy when the kids got into bed at night for story time. So we determined that the top of the tent would be 7 feet high and the sides 5 feet high. Any lower on the sides and it would be awkward for an adult to try to make a bed and any higher and you wouldn’t get the “tent pitch” feel. Once we had that decided, we estimated how many feet of our canvas to cut…I rolled out 30 feet of fabric. Yes. It was a VERY excessive amount (remember that internal panic I talked about at the beginning, it had not left me yet). I probably could’ve gotten away with 25 feet but what’s an extra 5 feet at that point??? (It’s 5 more feet.)
The supplies you’ll need to make your own:
- 3 – 2” Wooden Dowels (48″ in length)
- Fabric of your choice (we used: 11oz Broken White Bull Denim “aka canvas”)
- 7/8″ Leather Strips in tan color (currently out of stock, medium brown is closest in color)
- 1/4″ Sisal Rope
- 2 – 4” Screw Eyes (5/16″ size)
- 2 – 1-5/8” Screw Eyes (5/16″ size)
- 2 – Keyhole Hangers
- 2 – 4″ Wood Screws
- 2 – 2″ Wood Screws
- 2”x2” Lumber (cut to 48″ in length to match size of wooden dowels) for structural support.
- Velcro Squares
- Cutting Mat
- T-Square 24″
- Fabric Rotary Cutter
- Fabric Straight Pins
- 3/8″ Grommet Kit (if you already own a kit, get some refills here)
- Electric Drill (and specified drill bits)
- Screwdriver
The Pre-Step: Show Shade your original plan. Shade shakes head and tells you how to actually install it. Thanks again, Shade. So we (Shade) installed a 2×2 piece of lumber the same length of our wooden dowels perpendicular to the back wall. Why did he do this? Well, because we all agreed that this shouldn’t randomly fall on our boss’ children. Once we were in agreement about this (one second later), we figured out which way our floor joists ran. Those are the studs of the ceiling if you will and typically they will run the shortest length of the room. Lucky for us, that meant they ran parallel to the back wall of our tent, so we only had to use one piece of wood at the center point of our tent. Shade installed the 2×2 into the joists at three points and we painted it the same color as the room so visually it would disappear a little.

Step 1: Bowser then pre-drilled (aka pilot holes) into the 2×2 about 6″ in from either end. Pro tip: When drilling pilot holes, use a drill bit that is one size smaller than the nail or screw you are using, this will make your screw eye more secure.
Step 2: Twist your 4″ screw eye into your pilot holes. You can also buy a bit for your drill that hooks to the screw eye but again we were snowed in so we used the second best tool, our hands.

Step 3: Cut your fabric to size, in our case it was 4 feet wide by 30 feet long. Yeah, my back hurts thinking about it.
Step 4: Fold your fabric in half longways, this may take a minute. I recommend enlisting the help of a friend like Bowser! Once you find the middle, pin it so you don’t accidentally lose it (I, of course, didn’t do that…ha). Then put those cool grommet skills to use again, we are big fans of grommets now! Measure 6″ from the edge, mark it, grommet and repeat on the other side.

Step 5: Take one of your 2″ wooden dowels make a mark 6″ from the edge and make a pilot hole. Go slow, to avoid splitting the wood or going all the way through the dowel. Repeat on the opposite end. Side note: If that photo doesn’t look like we are drilling 6″ from the edge of the dowel then you are correct. I forgot to take a photo of this step so I stole it from a different step, oops! Moving on!
Step 6: Now that you have your pilot holes done, lay your fabric over the 2″ dowel. Line up the hole you just drilled with that amazing grommet you did and twist in your 1-5/8″ screw eye (they won’t twist in all the way and that is okay just try your best to get the majority screwed in place). It’s time to hang up the middle!

Step 7: First, cut your 1/4″ sisal rope. We cut two 24″ long pieces, since we wanted the top of the tent to be about 12″ from the ceiling and to give us extra length for the double knots. This is the teamwork step, ask your friend (Bowser!) to hold up the dowel while you stand on a ladder and tie the other end of the sisal rope to the screw eyes in the ceiling.
Step 8: Repeat on the other side. We probably adjusted the knots about 5 or 6 times to get them just right.

Step 9: I promise I was better with taking photos for the next DIY (yes you heard it here first, we have already done another bed DIY for you! coming to a blog near you soon). The next step is to take another 2″ wood dowel and make a pilot hole on the end of the dowel, the very end, in the center of the flat part. Again go slow when you drill and have someone hold the dowel upright for you (I know that is not the safest way to do this but it’s the truth, sorry). Then take the 2″ wood screw and drill it into that pilot hole leaving about 1/4″ to 1/2″ sticking out. Now for the step that is pictured above: On the back wall, we measured 5 feet up from the carpet and installed one of our keyhole hangers. Taking the end with screw slightly sticking out, lock it into place in the keyhole hanger.
Step 10: Then I held the wooden dowel in place while Bowser made a pilot hole 2.5″ from the end of the dowel, this time drilling all the way through the dowel into the drywall. She then drilled the 4″ wood screw through the dowel, drywall and into the stud securing the side in place. We repeated on the other wall on the opposite side of the room.

Step 11: We then draped the canvas over the side dowels and adjusted it to where we wanted it. Then cut off the excess fabric, finding where it just hit the ground and left about an inch extra so it wouldn’t have a gap.
Step 12: We then took the remaining leather from the window treatment project and decided we had enough to add little “trim” pieces. This was solely for looks and had no actual purpose other than looking very cute on camera. We just took a long piece of leather, held it up to the wood dowel and wrapped it around as much of the dowel as we could, cut to that length and added Velcro squares on either end of the leather and placed it on the wooden dowel.
YOU. ARE. DONE!
That is it, no more DIYs to explain for today. It has been great showing the process of my very first two DIY projects with you all and surely not the last now that I am working on all these styling shoots with Bowser and the rest of the production team! If you have any questions, comments or concerns, leave them below and I will do my best to answer them.


Shade installing the window shade is just too perfect.
HAAAA
Could you share some close ups of the window treatments?
Ditto! I’m dying to replicate these window treatments, but I cannot tell what you used to attach the treatments to the wall. And can you release the leather strap? More detail would be really helpful!
Seconded!
Yes. I am wanting to make these shades but am wondering how difficult it is to raise & lower them. Functionality is a must! Please tell me more.
OMG it’s so cute!
http://www.petiteandhungry.com
You’ve inspired me! Would love to see a step by step for the climbing wall DYI. My little man has been asking for something just like that!
For a first DIY, this is incredible well and neatly done, kudos to Julie and Bowser! The result is kind of modern/trendy/cozy and whimsical.
Could you explain please why you needed to use the lumber piece in order to fix the central pole? Is it sturdier? Why screwing in the lumber is stronger than traditional peg/pyton in the celling? Thank you very much!
I LOVE the GREEN! It’s perfect.
Without the tent and the cool window shades, it’s just a room with twin beds. With, it’s an adventure!