


If I had a dollar for EVERY. SINGLE. PERSON that told me that I was certifiably insane for the amount of work I was putting into my rental apartment, I could quickly move out of it and into a penthouse that looks over the Pacific Ocean, while sipping mojitos and staring at the pool boy below in his red speedo. But – as reality has it, I am still single, elbows deep in DIY and decor projects in my current apartment, and I could not be happier (unless, say, that poolboy came over to help me with my projects – I digress).
Finding a good apartment in Los Angeles is about as hard as finding a parking spot on a Saturday evening in downtown LA, if you do find one you jump on it as soon as possible and stop at nothing to get it. Good real estate in LA is always out there, but it comes and goes in a matter of hours. So is the case with my current apartment. I actually signed the lease on this place before the old tenant had even moved out. My point being, before I even moved in I knew that there were going to be some big projects to tackle, but that did not stop me from knowing that my 1920’s Spanish style apartment had some major potential. CUT TO . . . the awful kitchen floors.

Although most of the finishes and fixtures in the apartment are original, the kitchen floors somewhere down the line had been replaced with some LOVELY plaid inspired linoleum flooring. Before I had moved in I asked the landlord if it would be possible for him to replace the floors with a simple black and white check pattern that would more closely evoke the original style, while still keeping it a bit modern. He said, “Yes, we can replace the floors.” I walk in on move in day and this is what I see:

Replaced yes, but not quite exactly what I was going for (even though this totally may be some peoples vibe). I did a bit of research and concluded that there were some awesome peel and stick options out there that I could DIY myself. I had plans of grandeur when I first started pinning inspiration and wanted to originally go with a fun and graphic pattern, or something that would really serve as a statement.

I quickly realized that 1.) my landlord would kill me if I put in floors that looked like Kelly Wearstler had just moved in, and 2.) sometimes less is more. Especially in a small galley style kitchen like mine. So, I scaled it back and decided that just a simple black and white check would update the space, but still give me the modern yet timeless quality that I was needing.
So here’s what you will need:
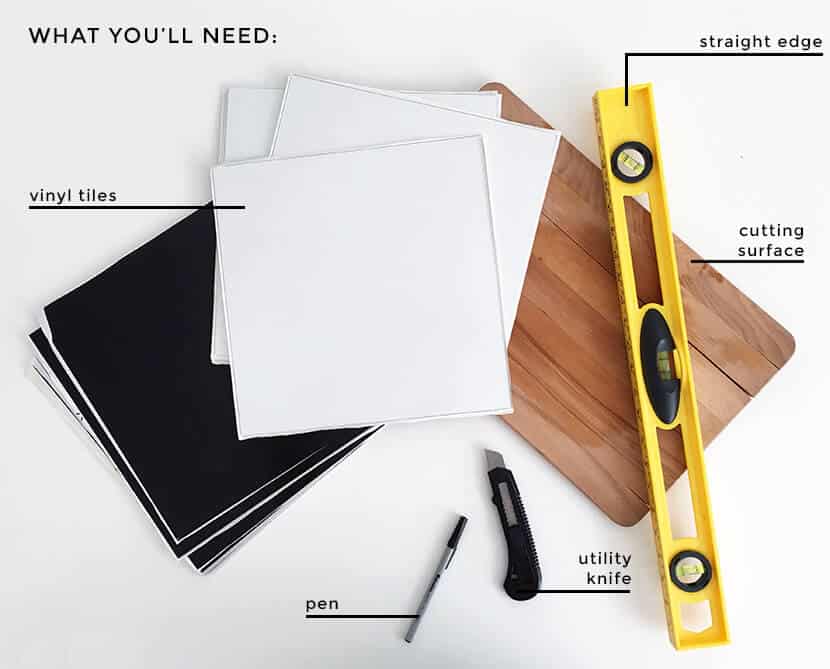
Vinyl Tiles: I ended up going with these guys. They have a great look in person, are not too glossy, but also not too flat, and are INSANELY affordable at $14 a box. You will need to calculate the size of your room and then you can order tile based on that. I ended up using a little under 4 full boxes.
Straight Edge: You will use this to cut and keep your lines straight.
Cutting Surface: I am sure there are better alternatives, but I just used a cutting board that I had at home.
Utility Knife: Make sure you have a sharp one, as you will want to just make one pass when cutting through the tiles.
Pen: This is used for marking up the tiles when you need to make any cuts.

STEP 1: Every house is going to be a little bit different, but you will want to start by removing the door threshold, which is the piece that covers up the gap between the two floors. I was able to pry up mine with a flat head screwdriver and a hammer, but yours may be screwed or glued down.

STEP 2: This is the fun part. If you are doing a simple black and white check like I did there are really only two options – starting with black, or starting with white (but, if you go with color or patterned tiles then there is a lot more creative freedom, or you could get your stripe on like Orlando did in his old kitchen). I laid out both options on the floor, took some photos, and ended up deciding to go with white as my center tile. In my mind it felt like it would be lighter in the space, although in hindsight I am sure it would have looked VERY similar either way. Another thing that I completely failed to consider (which my friend brought up immediately after I had tiled the whole kitchen) was that your center tile is going to get the most foot traffic as you walk down the center of the kitchen. And that going with black as your center tile may have been a better option so it wouldn’t get so dirty. You win some, and you lose some, but I am still happy with the way it looks, so it doesn’t bother me at all. And so far it has stayed very clean.

STEP 3: Luckily my existing floors had a pattern with a line that went all the way down the center of the kitchen (thanks landlord). So, it was very easy for me to use this as a grid and keep my tiles straight all the way down the kitchen. The instructions on the box mention laying down a chalk line, or even drawing a line on the floor to keep things straight. But, I was lazy, it was 3am, and I figured my already existing line was good enough. Quick tip: Do not lay your tiles corner to corner. In other words lay down your first tile, then lay down the two other tiles which butt up against its flat sides. Then you can lay your next tile, which will then butt up to the corner of your first tile. This will help keep things straight as you move along. The whole process should move very quickly – so pour yourself a glass bottle of wine, turn on some Frank Sinatra, and enjoy it.

STEP 4: This is the trickiest and hardest part. For the tiles that line up just with a flat edge I measured the length that the tile needed to be, and cut it down to that exact length. However, for the tiles that need to have multiple edges or curves, making a template with thin paper is very helpful. Then you can then just trace your edge onto the tile and cut. I made QUITE a few mistakes doing this, but the tiles are very easy to cut and I ordered a few extras for this very reason.
There you have it. All in all I would say it is a fairly easy project, and provides such a big difference for only $50 bucks and a couple of hours of your time. There is still a lot to do in the kitchen, but I am loving where it is headed so far.

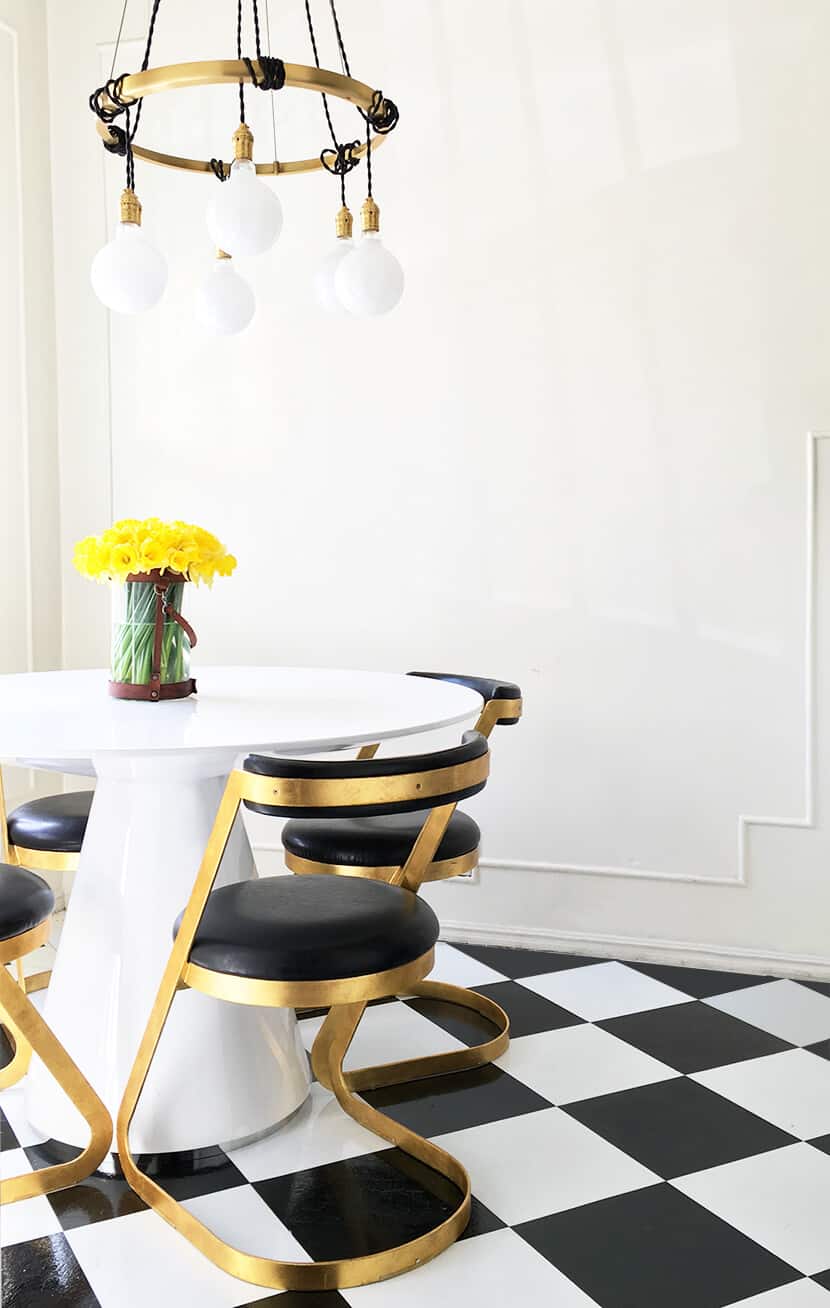
I love the way the floors open up the space. I learned as a wee young lad, whilst watching HGTV religiously during middle school, that in a small space laying floors on the diagonal, as well as increasing the size of the tile can work wonders in making the space feel larger. I also replaced all the knobs in the kitchen with these brass beauties which I am completely obsessed with. I have some big plans to make the cabinets look less like garbage, and more like functioning, non-embarrasing storage units, which also includes making sure all the knobs are at the same height. It still baffles me that somewhere down the line someone decided to drill the holes for all three of those cabinet doors at different heights.

The table and chairs are making me so happy, and I love how the modern white shape of the table works with the more retro styled brass and black chairs. Then that stunner of a chandelier from Schoolhouse Electric is a piece of art in itself.

Speaking of art, I have some BIG plans for art in this room. 30+ pieces in fact, floor to ceiling – wall to wall. Am I crazy? Probably . . . but I am into it so, it’s happening. And how can you say no when you have some insanely talented artist friends who are willing to fill your walls with beautiful things? Make sure to come back for the full kitchen reveal once I finish it all up and a massive vinyl tile flooring roundup that we have in the works.
Craving more makeover takeover? Make sure to check out my other posts: Brady Picks A Sofa | Brady Picks A Gray Paint | Brady Picks Some Lighting and the posts from the rest of the EHD gang: Sara Updates Her Childhood Bedroom – Intro | Sara’s Custom Closets | Sara Jumps Into Bed | Sara Reveals Her Bedroom | Ginny’s LA Living Room | Ginny’s English Roll Arm | Jessica’s Living & Dining Room.
For more of Brady’s Apartment: Brady’s Bedroom Makeover with Parachute | Brady’s Kitchen Reveal | DIY Channel Tufted Headboard | Brady’s Living Room | Brady’s Bathroom Refresh | Brady’s Living Room Refresh with The Citizenry
This looks awesome. My kitchen came with a slightly less fabulous but still cute version of this–a white and grey checked pattern. I’ve had thoughts of replacing some of the damaged ones, and there are even extra leftover tiles in the basement, but I’m slightly intimidated by the idea of ripping up the old ones (because most are fine, and only a few need to be replaced).
cactiandmountains.com
I have the dirtiest old vinyl tile floor in the kitchen of my otherwise pretty cute house and it makes me so sad but maybe this is a good option before I can someday replace it with something fabulous!
Do it! It was such an easy project and can definitely be removed down the line. My motto is enjoy where you live right now, don’t wait to make it fabulous. Would love to see what you do
I love every piece of this! So looking forward to anything you have to say about the kitchen cabinets and how to de-gunk them. They look eerily familiar…
The “replacement” floor provided by your landlord? That’s the floor of my kitchen, in my house, that I own. I actually don’t mind the pattern and think it’s kind of cute, but white linoleum in a kitchen that serves the primary entryway into your house, and your household includes a dog…it’s clean and sparkling for about 30 minutes every week. I guess we all have our crosses to bear. 🙂
I actually had a lot of people that didn’t mind the flooring that was there when I moved in, but I was ready for a little bit of an update and the flooring had a very yellow/faded tone to it so I was excited to bring something fresh and clean in. Otherwise the floors that were there would have been great.
So did you get permission from the landlord to put the new tile down over the brand new lino? I would guess the peel and stick tile could be removed if needed but it might leave glue on the lino.
Be aware that even if your landlord likes the new tile and it improves the value of their apartment they can still keep your damage deposit if you didn’t get permission to do the improvements.
Not all landlords will let you beg for forgiveness and as a former landlord I’d be pretty ticked if my renter had damaged brand new flooring (even if it wasn’t up to designer standards) by installing additional flooring over top that might leave glue residue or might be a pain to get off.
Judging by the photos it sure didn’t look brand new but rather something that came out of a habitat restore or one of his other units. Which is fine whatever. I’m a homeowner now but when I was renting I always went into new places with the assumption that they were going to keep my deposit regardless of what I did or didn’t do. So screw em. I’m doing what I want. They can keep my money.
From what I could tell, the flooring that they put in didn’t look new. it had some damage to it and was a faded white/yellow-ish color. I am all about loving where you live right now and who knows how long I will stay here so I might as well make it enjoyable for the time being. 🙂
That’s exactly what I wondered–was the landlord tucked?! It looks great and I’m with Brady, gotta love it!
Brady, this looks so great! I don’t think you’re insane for making your rental somewhere you want to live – especially in LA. And seriously, once you pried up that threshold you must have been thanking all your lucky stars that at least one sliver of the floor is perfectly clean now… The moulding in the space is darling and you really did SO MUCH to upgrade the whole room. It’s beautiful. Good work, sir.
Fun and fabulous – can’t wait to see the art go up!! Are the vinyl tiles removable?
Yes! They are removable. I had to peel a couple up that got damaged and they came right up and just left a little bit of residue which I easily cleaned with goo-gone.
Looks good! Your furniture and lighting choices for this space are awesome.
As a renter, I am so, so grateful to have blog posts like this – what do you do when it’s not your house and you can’t rip up the floor? Most blogs are by homeowners – totally understandably – it’s so lovely to get some renter-geared posts! More of this, please!!
There will be quite a few coming your way as I continue to work on your space. I am glad that you are enjoying my ramblings and projects 🙂
bravo brady! the floors look fab, but i’m really eyeballing that table & chairs combo with the perfect chandelier for good measure! can’t wait to see the final product…
I’m blown away that you transformed this floor for 50 bucks….your selection of light, table and chairs are fabulous but I would never have thought peel and stick tiles could look so good. Can’t wait to see all the art hung! Thanks for sharing.
This turned out so good! I love how affordable this is, and how it really transformed the space!
Paige
http://thehappyflammily.com
cute, but boy will it be a pain taking these off. .. and you may be paying for a new real floor when you move. I found a product I’d reccomend . I found lino that does not require glue, just cut and place.. you have to remove/ replace trim, or add quarter round to keep it in place. I used it in a bath..( polka dots! ..it’s a tiny basement bath) when I remodeled it again, I used a solid mint green, and this time put clear clalk around the edges. (This was to prevent a little mildew I found removing the old next to the shower.)
That sounds like an awesome option for your space. I actually looked into something similar for my kitchen but as the floors and walls are not square by any means ( 1920’s construction) I ended up going for these as they stay in place and gave me the look that I was wanting. They are somewhat removable as well. Had to pry a few up and it left just a little bit of residue that I was able to clean up.
This was great to see – I’m considering peel and stick tiles for our upstairs bathroom reno, which currently has very sad looking old gray linoleum. The only thing sadder than old linoleum flooring is old GRAY linoleum flooring. This makes it look easy, and I appreciate the tips on how to keep things lined up!
http://danielleandco.com/blog/2016/amazon-pendant-light-roundup
LMAO about that “new” floor your landlord put in. I do not think you are crazy for fixing up your space. I do the same thing whenever I know I’m going to be in a place for more than six-months. I actually pulled off dirty old wallpaper and painted my entire kitchen (including cabinets) one time without asking the landlord first… He was a little stunned but fortunately didn’t care since I paid for it! (Full disclosure: this was my second apartment with this landlord, so I didn’t actually expect him to mind.)
I LOVE this idea of the peel and stick floor. It looks fantastic. I also am in love with those dining chairs and want them so bad. Thanks for the great post!
This is so quiche! Beautiful aesthetic. Great work!
Insanelyyyyyyyy cool. I wanna meet this writer. Can he design my apartment?
I am living for the touches of brass against the pared back b&w palette.
Brady, I just want to say that I LOVE THIS! Maybe the best $50 ever spent. I do also appreciate the landlord’s effort with the new floor. Oh, and those chairs are everything.
Emily, Ginny, Brady, and Sara,
I just want to say that I love this series. It’s so nice to see makeovers of people in relatable situations. I live in a rented apartment and Brady is speaking to my heart so hard right now. I am a huge believer in making my home a home no matter how long I’m there. I also really appreciate Sara’s series. My sister moved back home to save on rent while in grad school and we did a similar upgrade of her room. And lastly, Ginny, you have me wanting to put all my furniture on castors!
Thank you for opening your homes to Emily’s readers. I’m sure I’m not the only one that loves this series. Keep up the good work!
Yea!!! So happy that everyone loves all my people/friends/employees. They make this blog so much better so i’m psyched that people are into the series 🙂 xx
I’m not typically a big fan of checkered floors, BUT this looks incredible. It’s absolutely perfect in the space, and I love that you were able to make such a drastic improvement for so little money.
What a neat idea! Enjoyed your post. This made a big difference, and I wouldn’t have thought of it. I also appreciate your inspiration photos. Doing a pattern more complex may push this project outside my skill level, but it’s still fun to think about doing something similar.
I don’t live in a rental, but I still find it super interesting to see which options you do – throughout the apartment. It’s still relatable to homeowners, especially those trying to make improvements without breaking the budget!
I love this post. It’s amazing how $50 and 3 hours of time can transform a room and make you feel good about coming home to it. I’ll all about investing in changes to a rental. It’s your home! Thanks for reppin’ the renters!!!
YAY! I love this series so much. I’m so curious to see what you do with cabinets!!
My immediate reaction was: white curtains mounted at ceiling height would add some great warmth and depth to the room. Are you thinking about doing curtains along with your art?
Brady (and Emily), as a renter who has an itch to update my apartment in a small/feasible way, I’d love to hear more about the other rental renos you’ve done. Thanks for this post – I may have to update my nasty linoleum floors, too!
I loooooooove what you did with this room. The chairs are to die for, absolute stunners! I’m also a renter spending crazy amounts of time and money (not that much, but if you think that it’s not my house it’s quite a lot) in home improvements. Recently put some faux marble vinyl floor in the kitchen and it worked a treat. So easy to install and so affordable, a renter’s best friend. I guess when you reach a certain age (I’m 32, don’t know if you’re in your thirties) you want to live in a nice house, and if you can’t afford to buy one, at least you want your rented flat to look proper.
Click on my name if you’re curious to see how my kitchen makeover turned out. Not as glamourous as yours, but I’m soooo happy with the end result.
Want to see more of your flat!!
Wow, that looks terrific, Maria! Also love your black wall!
Thank you!! I hesitated about the black wall in the beginning but once I painted it I absolutely loved it! 🙂
WoW. That’s amazing! I’d love to repost that if you are interested – especially if you can divulge cost and process for our readers. So pretty!! Email hello@emilyhendersondesign.com if that is something you are interested in. xx
Hi Emily! That would be fantastic!! I will send you an email today. xx
Beautiful transformation, Maria!
Hey Brady it looks so good! Chairs are awesome too. Did I miss some posts on your apartment? I ask because I have been looking forward to your living room reveal. Last post I read was about the chest you got for that room.
Ha. it’s coming, but no you didn’t miss it. The pressure is on BRADY!!!!
Hi Brady,
Love this DIY! I’m not typically a DIY-er but I’m going to take this one on! What do you think will happen when you want to remove the tile? What’s the residue situation on top of other vinyl flooring (that looks like wood).
This specific project is for my salon studio– I do eyelash extensions. So this DIY would need to be completely removable when I’m ready to move out of the space, would you suggest these tiles?
Have you experimented with lifting your tiles? Would love to hear any insight you might have. Also on a scale of 1-10, 10 being an insane DIY tufted headboard, how difficult is this for a first time DIY-er? Thanks!
Amanda, sounds like such a fun project you have on your hands. The tiles do come up but they leave a slight residue which I was able to get up with a little goo-gone. So if you are laying it on top of a wood floor I wouldn’t recommend it as it may damage the wood or wood finish to use goo-gone on it. But I believe there are some other awesome Vinyl Tile options out there that are a bit more removable. On scale of one to 10 it really was SO easy, so maybe a 2. The hardest part is trimming the edge pieces, but if you can cut a piece of paper then you should be able to tackle this one. GOOD LUCK!
I’m tempted to start putting in more work on my rental too, even though I know it won’t do me any good long term. BUT it’ll definitely make this place feel more like a home vs. a place I store my stuff.
DO IT! I cannot tell you how much happier I am and how much more I enjoy spending time at my place now that I have made some updates. Make your home your home no matter where that home may be (even if it is a rental). Would love to see what you do.
Love everything except the chandelier. I like the overall shape but may be something different.
a) that kitchen looks almost EXACTLY like my old kitchen in Hancock Park, though we thankfully had saltillo in the kitchen. Love the old ice boxes.
b) my new apartment had some really terrible fake wood linoleum in the hallway so I paid my super to replace it with classic black and white check. Cost like $80 bucks, I didn’t have to do anything and it made SUCH a difference. All for inexpensive tweaks to rentals
looks great!
Your landlord’s pick was fine but subtle…your b&w tiles stand out — thanks for showing the two different ways you tried them. It made a big difference and those chairs are divine!
I think the most interesting takeaway from this is that you found a way to make the space more appealing in a temporary way. Sometimes, DIY ideas are so permanent or difficult that they’re impractical for renters. Thanks for sharing an idea that non-homeowners can use.
I love the look you got! I used those very tiles from Lowe’s, I think they were, in our last house in the kitchen and sunroom.
In this house, I couldn’t do black and white in the kitchen on the existing stone tiles, so I whitewashed those. However, in our living room, we ripped up the carpet, and made “tiles” out of 3/4 inch birch plywood, 24″ each, and painted them black and white. Then we nailed them down. The hardest part was the leveling, and I decided not to do diagonal placement in the interest of saving my marriage, having already done that in the last house…
Anyway, great look, and good for you.
Brady, thanks much for sharing. You kitchen is adorable! The black and white tiles really give the room that finishing touch. Would you mind sharing the source for your table and chairs…they are gorgeous!
It is all linked up in the post 🙂 The table is from Wayfair and the chairs are from Dwell Studio. I love them!
Found it. Thanks!
Hi Brady, I love your posts, please keep them coming!
I think your personality on the walls thru your artist friends art works will look great as well….looking forward to it.
Thanks again for sharing.
Gabrielle
Amazing! I would love you as a tenant if I owned an apartment!!
Wow! What a great post. Can’t wait to read more on the progress especially seeing the art wall because that is an AWESOME idea!!
Brandy, you are a total genius!!!
This looks absolutely, positively, amazing. Like so amazing. Like I can’t think of another word amazing. Brilliant.
Cool!
http://www.petiteandhungry.com
The floor looks great and cleaning the paint off the cabinet hinges will go a long way to helping the cabinets look nicer. I cleaned the hardware in my rental kitchen and the plating had pitted on the hardware but I hit them all with metalic brass spray paint. I also put some extra shelving in some of the cabinets that had only 1 shelf where 2 would work better. I think it’s totally worth doing projects like that as well as bringing in your own light fixtures. It makes such a difference.
I did this to my first house (981sq ft!) in 1995. It was the perfect starter solution!
Brady, if you don’t ask me for some art im going to be personally offended.
Is that Shauna Greene??? What is your art, lady?
Did anyone else click on to the source for these tiles? Cause, um, at the end of the spec section there is a warning (to residents of California because of Prop-somenumber) regarding the product containing substance that has known cancer causing effects and birth defects. So, er, no thanks.
Here I thought I was the queen of easy rental temp treatments! I am so in love with this. My wheels are turning with flooring, wall treatments and all the other decorative miscellaneous. Thank you for sharing!!! Also, do you mind me asking where you found the vinyl tiles? Also how easily are they removed? Thanks again! Xoxo
They tiles are linked up in the post, but they are from overstock: http://www.overstock.com/Home-Garden/Nexus-12-x-12-inch-Self-Adhesive-Vinyl-Floor-Tile/8478290/product.html?AID=10654383&CID=207442&PID=4441350&SID=~7V6Ag–393390213&TRACK=affcjfeed&fp=F
Your place looks great..charming with a twist of Art Deco classic L.A. Terrific chairs! I love character, original features & working with what you have over full blown renos..”if it ain’t broke”..it’s just more interesting & creative & relatable.
this is just beautiful!
Brady: what gray did you pick for your living room?! I have been waiting since your post in November to hear…please don’t say you haven’t yet decided and/or painted like many of us non-designer types would do?!
I went with Kendall Charcoal by Benjamin Moore. There is a pic of it in the post. It is a very deep gray and I am still deciding if I can handle it but for now I love it. The full reveal is right around the corner 🙂